Low Vision Users
NVDA includes a number of features to help users with low vision. On this page, you will find:
- The NVDA Key
- Magnifier
- Visual Highlighter
- Reducing Speech
- Following the Mouse
- Working on the Web
- Other Windows Settings
The NVDA Key
Most NVDA commands use the NVDA modifier key. That key is either insert key by default. You can also set it to caps lock either when first setting up NVDA, or later from the keyboard settings. You can also have it set to both and use whichever is more convenient for any given keystroke.
NVDA assumes that numlock is OFF. If you would like to use the number pad for numbers, you might prefer to have NVDA set to “Laptop keyboard layout“
.
Magnifier
NVDA (since NVDA 2026.2) includes a built-in screen magnifier.
Features
The magnifier offers a range of features:
- Full screen mode
- Colour filtering (Normal, inverted, greyscale)
- Ability to move the view with keyboard or mouse – either incrementally, or jump to the edges
- Ability to zoom up to 50x!
- Keystroke to quickly view the whole screen for several seconds before zooming back in.
- Ability to follow NVDA’s focus, mouse, object navigation or review cursor
- Centred or "relative" tracking (if you move the mouse to a position 2/3 of the way to the right of screen, it appears 2/3 of the way across the magnified view)
With more features planned in future updates.
Here is a demo of the magnifier:
Magnifier Keystrokes
The NVDA User Guide has an extensive section on the magnifier. You can find that from NVDA’s help menu (press NVDA+n, then h, then enter) or the online user guide
The keystrokes for the magnifier are:
- Enable magnifier: NVDA+shift+w
- Increase magnification: NVDA+shift+equals
- Decrease magnification: NVDA+shift+minus
- Cycle colour filters: NVDA+shift+i
- Show entire screen overview: NVDA+shift+L
- Pan view: NVDA+alt+arrows
- Jump to screen edge: NVDA+shift+alt+arrows
These can be changed in NVDA’s Input Gestures.
You can also set keys for cycling the tracking mode, which is otherwise available in NVDA’s Magnification settings.
Comparison with Windows magnifier
If you are considering the differences between the NVDA magnifier and the Windows magnifier, we included some things to consider in our In-Process blog post on Magnifier
.
If you use the Windows magnifier or another magnification program, and want to use NVDA for speech, that should work fine. Just as you can have multiple screen readers installed but we only recommend having one running at any given time, we recommend only have one magnifier enabled at a time.
Visual Highlighter
NVDA’s Visual Highlight puts a border around the current object with focus, which can highlight what NVDA is reading.
Press NVDA+control+g to open NVDA’s settings directly. Press control+tab to move between the different pages of settings. Use control+tab to move to the "Vision" page. The user guide describes the colours. Here are the descriptions:
- Solid blue highlights a combined navigator object and system focus location (e.g. because the navigator object follows the system focus)
- Dashed blue highlights just the system focus object
- Solid pink highlights just the navigator object
- Solid yellow highlights the virtual caret used in browse mode (where there is no physical caret such as in web browsers)
NVDA is able to move the focus around documents such as web pages where normally navigation doesn’t work. For instance, without NVDA running, you can’t arrow through a word on a web page. NVDA displays a pink line surrounds the current element with focus, such as a heading or paragraph of text. The yellow outline surrounds the character within that element which has focus (Usually the first character, unless you have moved the caret with, for instance, right arrow). A blue line surrounds the current interactive element (something you can press tab to move to). The "Basic Training for NVDA" module has more tips and techniques for navigating with the keyboard.
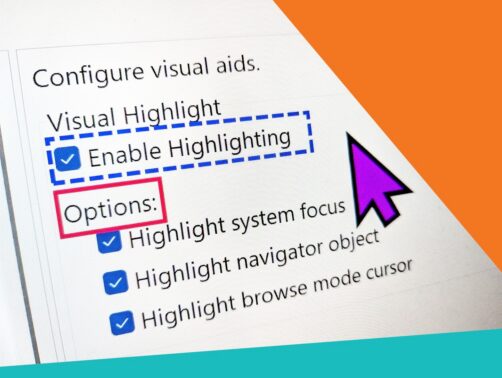
Screenshot of NVDA’s settings screen with a blue dotted highlight for the system focus around the “Enable Highlighting” option, and a pink highlight for the navigator object around the “Options:” heading. The mouse pointer is larger and coloured (refer to Other Windows Settings below).
Reducing Speech
One of the advantages of using NVDAs visual features as a low vision user, is that the keystrokes remain consistent even as your use changes. If you want to use the magnification features without much or any speech, it is possible. If you do rely on speech, then please be careful adjusting these options.
Individual spoken elements
By default, NVDA reads a lot of information. Much of this is customisable, and there are some things low vision users often like to have control over:
- Formatting & elements. NVDA’s Document formatting options allow you to configure whether NVDA reports changes in font or style, as well as whether an item is a heading, a list item, or a link. Press NVDA+control+d to open the document formatting settings. Ensure any you wish to have reported are “checked” and any you do not want read are “not checked”. You can always press NVDA+f when focussed on something to have NVDA report the formatting information about it.
- Speak typed characters and words. Press NVDA+2 to cycle whether NVDA speaks each character (letters, numbers, and punctuation) as you type it. Press NVDA+3 to cycle whether NVDA speaks full words as you finish typing them. Press NVDA+4 to cycle whether NVDA speaks command keys (such as enter, arrows or function keys) as you press them.
- Mouse settings. By default, NVDA reports text as you hover the mouse over it. NVDA’s mouse settings give you additional controls such as reporting when the mouse cursor changes shape, such as the “normal cursor” when it is a triangle with a tail you can click on buttons with, or when it becomes a “text cursor”, showing an “i-beam” when over a text edit. Press NVDA+control+m to open the mouse settings.
- Symbol level. Press NVDA+p to cycle through NVDA’s symbol levels. This controls how much punctuation and other information is read. At “none”, NVDA won’t read much more than letters and numbers it encounters. At “all”, NVDA will read every symbol, such as the quotation marks, commas and full stop in this sentence.
- Reporting capitals. NVDA’s speech options provide several options for reporting capital letters when typing or navigating by letter. These include increasing the pitch, saying “cap” or beeping. Press NVDA+control+v to open the speech settings where these can be configured. On the same screen you can also adjust just about everything else about the synthesizer, from the voice used, to the options when you press NVDA+s to cycle through speech modes (more on this below).
Speech Mode
NVDA includes several “Speech modes”. These are:
- Talk: NVDA speaks everything
- On-Demand: NVDA only speaks when an NVDA command such as NVDA+down arrow (Laptop: NVDA+a) for "Say All".
- Off: NVDA will not speak anything
- Beeps: Instead of speaking, NVDA beeps
Press NVDA+s to toggle the speech settings.
Following the Mouse
By default, NVDA reports text under the mouse. This is what many mouse users prefer, in which case there is no need to change anything. Press NVDA+m to toggle this feature if not desired.
A lot of users would like the ability to hover over text and press a key to have it read. We are working on a feature for this. In the meantime, one partial workaround is to have the review cursor follow the mouse and use the review cursor say all to read at least the current object text. To do this:
- Press NVDA+control+g to open NVDA’s settings.
- Press control+down arrow until the focus is on "Review" settings.
- Press tab to "Follow mouse cursor".
- Press spacebar to toggle this option. Ensure that it is checked.
- Press enter to close settings.
Now you can hover over text, then press numpad plus (Laptop: NVDA+shift+a) to have NVDA read from the current point onwards. Note that this will only read the current "Object". The "Basic Training for NVDA" module, covers objects in detail. On a web page it often means the current element, or text up until the next link, etc.
Working on the Web
Web pages
NVDA has two modes it uses on the web:
- Browse mode: Used for navigation. Letters can be used for navigation, such as h to jump to the next heading, e to jump to the next edit field, and more. We call these "Single letter navigation" keys.
- Focus mode: Used for filling in forms. Single Letter Navigation does not work, so you can type into edit fields.
NVDA changes between these modes automatically. By default, NVDA uses sounds, rather than speech to alert you that it has changed between these two modes. In NVDA"s "browse mode settings" there is an option for "Audio indication of Focus and Browse modes". This option controls how NVDA reports when it changes between Focus and Browse modes. When checked (the default), NVDA plays a higher pitched beep to indicate focus mode, and a lower pitched tone to indicate browse mode. If unchecked, "Focus mode" or "Browse mode" will be reported by speech.
If needed, press enter to put NVDA in focus mode and escape for browse mode.
Copying information from web pages
Traditionally, NVDA has only the text, not formatting or images, when copying information from web pages. It has also only worked when information was selected with the keyboard. NVDA has an option called "Native Selection Mode" which lets users copy formatting as well.
Importantly, if you select text with the keyboard and then try to copy it with control+c, this will only work when using "Native Selection mode".
This mode can be toggled for individual pages with NVDA+shift+f10.
Other Windows Settings
Windows has a number of features which can be useful for low vision users:
Before adjusting these, the first thing worth considering as a low vision user, is getting a larger monitor, if possible. The larger the screen you use, the larger everything on it can be before you need to start making compromises about what can be shown at once.
Once you have your monitor setup, a suggested order to adjust the Windows settings is:
To make everything bigger:
- Scale (Change the size of text, apps and other items). This makes everything, text and graphics larger. The larger everything is, some programs may struggle with objects overlapping or not appearing on screen.
- Text size (Make text bigger). Good for text but can become disproportionate to icons and graphics. Note that in the link above, Microsoft list text size before scale because although it only affects text, it is lower risk. Only changing the text size is less likely to break the way apps appear. The exact settings for each of these options will depend on each user’s specific needs and the apps in use.
- Use magnification, either (NVDA’s magnification or Windows)
To make the mouse easier to see:
- Make the mouse pointer larger. Adjusting the mouse pointer size and colour can make it much easier to see. If made too large, it can get in the way of viewing content.
- Mouse Indicator, in “Mouse pointer and touch”, shows a circle around the mouse pointer when control is pressed.
- Mouse Pointer Trails, show the previous position of the mouse for a short time.
- Hide Pointer while Typing, in the “accessibility mouse settings”, can make it easier to type without a larger mouse pointer getting in the way. On the other hand, this may make it harder to keep track of where the mouse is.
Settings to make other things easier to see
- Text Cursor indicator: Puts a visual indicator at the top and bottom of the text caret to make it easier to see visually.
- Visual effects: Always Show Scrollbars ensures they won’t disappear. The same settings screen also offers options for transparency and animation effects. Turning these off are often promoted for improving performance, but they can make things easier to see as well.
- >Using Dark Mode in Windows, and other programs, can reduce eye strain, and on laptops, even improve battery life.
- You can also adjust other colours in Windows which may make things easier to see.
If you need further help with Windows settings or setting up other Microsoft products for low vision, Microsoft have a free Disability Answer Desk who can help.