We are continuing to get closer to the release of 2024.1. As well as a new beta for that, we also have a new 2023.3 point release. Also this week, we have a look at portable copies of NVDA. What are they? When should you use one, and how do you set them up? Let’s dive in!
NVDA 2023.3.3
NVDA 2023.3.3 was released recently. This is a security patch release to fix a security issue. We encourage all users to upgrade to this version.
For full details and to download, please visit the NVDA 2023.3.3 release announcement.
NVDA 2024.1 Beta 7
We are also up to Beta 7 of NVDA 2024.1. This is a great chance to get a feel for what will be included in the next version of NVDA before it comes out. And of course to ensure everything works as expected. If it doesn’t, please do report any issues.
And what is new in NVDA 2024.1 Beta 7? Changes in Beta 7 include:
- When copying text in Microsoft Word with NVDA’s browse mode enabled, formatting is now also included
- Improvements to documentation
- Several fixes to Native Selection mode
- Fix occasional error when the session is locked/unlocked
- Updates to translations
- the security patch from 2023.3.3. (This was first introduced in Beta 6 which came out after the last In-Process)
To read the full information and download the beta, head to the NVDA 2024.1 Beta 7 release announcement.
The release announcement also contains the full list of what is new in NVDA 2024.1, so do browse that if you haven’t already. We’ll start covering individual features next time around!
We have had a couple of questions around why there are so many betas this time around. There are several reasons for that. Firstly, the security patch releases. Each time we have released a security patch, we have also incorporated that change into a new beta. Next, we always planned a longer release cycle this time around because of some of the larger changes in 2024.1. One of the reasons this is an API breaking release is because there are some big updates internally. NVDA now uses Python 3.11, and many pip dependencies such as comtypes, py2exe, SCons and wxPython have been updated. While those terms will only make sense to developers, what it means for the rest of us is there are lots of changes under the hood. We’d like to ensure that those changes are all well tested, as well as giving the add-on developers plenty of time to update their offerings by the time the stable build comes out.
And, as we regularly say, we’d rather take a little extra time to make sure we get it right. To that end, we do encourage you to test out the latest 2024.1 beta. Please do report any issues you encounter on our GitHub issue tracker. You may prefer to run it as a portable copy to keep your add-ons working in NVDA 2023.3.3, so we’ve included a guide to that below.
Creating a portable copy of NVDA
NVDA can be installed like most programs on the PC. This allows for features such as having NVDA start on the Windows logon screen. There are times when this may not be possible, or wanted. Installing isn’t possible if you don’t have admin rights to the PC you are using, such as at a library, or when working on a sighted friend’s PC. Or, if you are trying out the latest NVDA beta version but don’t want to overwrite your stable NVDA install. There are two ways to create a portable copy of NVDA, from the downloaded launcher, or from a running copy of NVDA. Both end up the same, the difference is mainly in whether you already have a copy of NVDA running or not. Another advantage of portable copies is that, like installed copies, you can make whatever changes to NVDA’s configuration you need, and save them to use again next time.
Creating a portable copy from the downloaded launcher
This method is useful if you do not already have NVDA, or are trying out a new version of NVDA before installing.
- Download NVDA from NV Access (or from the release announcement for a Beta release)
- Run the downloaded file. This can be done from your browser’s download window, or by opening File explorer and navigating to “Downloads”
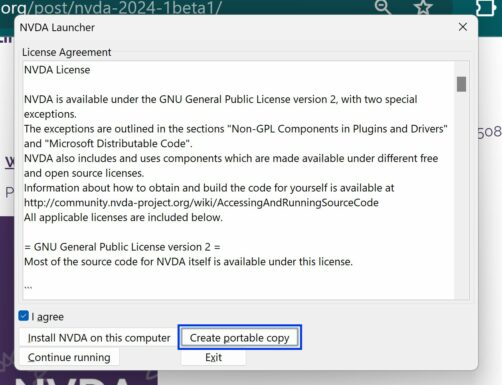
- Music will play while NVDA loads. Once loaded, the license agreement displays
- Read the license agreement, then press tab to the ‘I agree” checkbox, and press spacebar to check this
- Press tab to move through the options. The first option is “Install NVDA on this computer”. Press tab again to move to “Create portable copy”
- With the focus on “Create portable copy”, press enter
- The screen which appears asks for the directory to create the portable copy in. You can either type the address, such as
c:\NVDA\, or press tab to the “Browse” button, press enter on that, and use the file explorer window to select the folder - Press tab to “Start the new portable copy after creation”. Press spacebar to check if you would like to start the new copy once it is created
- Press tab to the “Continue” button, then press enter to create the portable copy
- NVDA will install the portable copy. This may take a number of seconds, or complete almost instantly
- NVDA will report “Successfully created a portable copy of NVDA at
” (where is the name of the folder used) - Press enter to close the dialog. If “Start the new portable copy after creation” was checked, NVDA will restart as the new version, and the welcome dialog will be displayed
Please note: NVDA does NOT create a sub-folder. The necessary files will be copied directly into the specified folder. If you specified c:\NVDA for instance, then nvda.exe and all the other needed files would be created there.
Creating a portable copy from a running copy
This method is available if an installed or portable copy of NVDA is already running. It is also useful if you would like to keep your existing settings in your portable copy. This is convenient when moving to a new PC and wanting to copy your settings over. The existing version can be setup as a portable copy on a memory stick and installed on the new PC from there.
- Have NVDA running
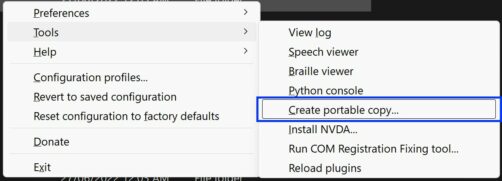
- Press NVDA+n to open the NVDA menu
- Press t to open the “Tools” sub-menu, then c to activate “Create portable copy”
- The screen which appears asks for the directory to create the portable copy in. You can either type the address, such as
c:\NVDA\, or press tab to the “Browse” button, press enter on that, and use the file explorer window to select the folder - Press tab to “Copy current user configuration”. Press spacebar if you would like to copy your current settings to the portable version
- Press tab to “Start the new portable copy after creation”. Press spacebar to check if you would like to start the new copy once it is created
- Press tab to the “Continue” button, then press enter to create the portable copy
- NVDA will install the portable copy. This may take a number of seconds, or complete almost instantly
- NVDA will report “Successfully created a portable copy of NVDA at
” (where is the name of the folder used) - Press ENTER to close the dialog. If “Start the new portable copy after creation” was checked, NVDA will restart as the new version, and the welcome dialog will be displayed
Please note: NVDA does NOT create a sub-folder. The necessary files will be copied directly into the specified folder. If you specified c:\NVDA for instance, then nvda.exe and all the other needed files would be created there.
Installing NVDA from a portable copy
If you have tested the portable copy of NVDA and decided you would to install that version on your PC, you can install NVDA from it. To do that, follow these steps:
- Have a portable copy of NVDA running
- Press NVDA+n to open the NVDA menu
- Press t to open the “Tools” sub-menu
- Press i to activate the “Install NVDA” option
- A screen of options is presented. The first option is “Use NVDA during sign-in”. This controls whether NVDA runs on the logon screen; this is checked by default. Press spacebar to uncheck this if desired
- Press tab to move through the other options and press spacebar to check or uncheck as needed. The options are whether NVDA should create a desktop icon and control+alt+n shortcut, and whether to copy the portable configuration to the newly installed copy
- After changing any options needed, press tab to the “Continue” button. Press enter to start the installation
- The User Account Control dialog appears. Press alt+y or tab to the “Yes” button and enter to accept this. This is required when installing any software
- NVDA will install. This should only take a few seconds
- A dialog is displayed confirming that NVDA has been successfully installed. Press enter to close the confirmation which will also start the installed version
That’s all for this week. Do be sure to update to NVDA 2023.3.3 and / or NVDA 2024.1 Beta 7, and do reort any issues you encounter on GitHub.