I’m still getting used to writing 2022, and we’re into our third month of the year! What I’m not confused about, is that we’ve once again got an exciting edition of In-Process for you, with lots of tips and tricks. Let’s get right into it:
(Edit: 20th March, to clarify that “Always show all items in the notification area” no longer exists in Windows 11. Thanks @TalkingDroid on Twitter for pointing that out!)
Closing windows on the fly
Did you read our piece on the many ways of Switching Windows last time around? It was very popular and even we learnt some new ways to switch windows. Which was your favourite?
Following on from that, Shawn sent us another command you can use with alt+tab:
“You can hold down alt, then alternately press tab and delete to close windows 1 by 1 quickly. And of course if you’re alt tabbing through windows and find one you want to get rid of, you don’t have to let go, wait for NVDA to load the silly thing up and then press alt+f4, you can just press delete and then keep alt tabbing. The only wrinkle is, if there’s an are you sure you want to close this program, or do you want to save changes you won’t hear that doing it this way, and of course the window won’t close until you let go of alt and take care of the dialogue. So if you’ve got a ton of browser or explorer or whatever windows open you can close them lickety split, but don’t forget to stop on that window where you have a bunch of tabs open that’s asking you if you want to close all tabs, or the notepad window you don’t want and close or don’t close, or save or don’t save it before you move on.”
Great tip, thanks Shawn!
Accessing the notification area
Let’s stick with the accessing running programs theme and have a look at the notification area. Also called the system tray, this is the area of the screen at the right side of the taskbar, where the clock is. The notification area stores system icons and programs which run in the background. Programs you don’t need to interact with very often. The network status, volume control and OneDrive icons are here. NVDA also places an icon here while running. Windows security, or third-party anti-virus or firewall programs are also kept here.
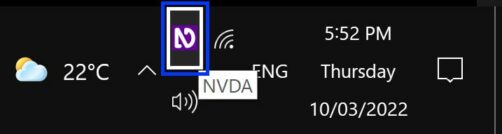
Notification area with NVDA icon highlighted
(Edit: 20th March, Thanks to @TalkingDroid on Twitter for correcting that “Always show all items in the notification area” no longer exists in Windows 11. Steps updated below)
NVDA has its own keystroke – NVDA+n, to open its menu. Not every program or item in the notification are does. To get to the notification area, press Windows+b. Use the arrow keys to select the icon you need. Press enter or spacebar to activate the icon (the same as left-clicking the mouse). Press the applications key to open the context menu (like right-clicking the mouse).
If you encounter the “Notification chevron button” then some of the icons are hidden. Press enter or spacebar to activate this, then use the arrow to navigate.
Whether all icons are always shown on the notification area can be set in Windows settings. Press the Windows key and start typing “Select which icons appear on the taskbar”. Select the system settings option with the same name and press enter. In Windows 10, the first option is “Always show all icons in the notification area”, which is a toggle. If off, you can tab through the other programs and select whether they are shown or hidden. In Windows 11, you need to tab through each program and select whether each one is shown or hidden. If all are shown, then the overflow chevron won’t be used.
Startup apps
Finally, a short bonus tip to end with. There have always been ways to find what apps were loading on Startup. One common way is via the task manager. Windows 10 also has a simpler interface in its settings. Press the Windows key and type “startup”. If the “Startup apps” system setting is not the first option, arrow down to it, then press enter. Press tab to move through all the items which can start on startup. The focus moves to the toggle button for each item. If the toggle button is pressed, the item will run on startup. If the toggle button is not pressed, the item will not run on startup. Press spacebar to toggle an item. Press NVDA+numpad 6 (or NVDA+shift+right arrow if using laptop keyboard layout) to read the impact of the current item. High impact items can make the system take longer to load.
That’s all for this week. We’ll be back with news on NVDA 2022.1 shortly! In the meantime, have you got a tip you’d love to share? Let us know.